Project Brief
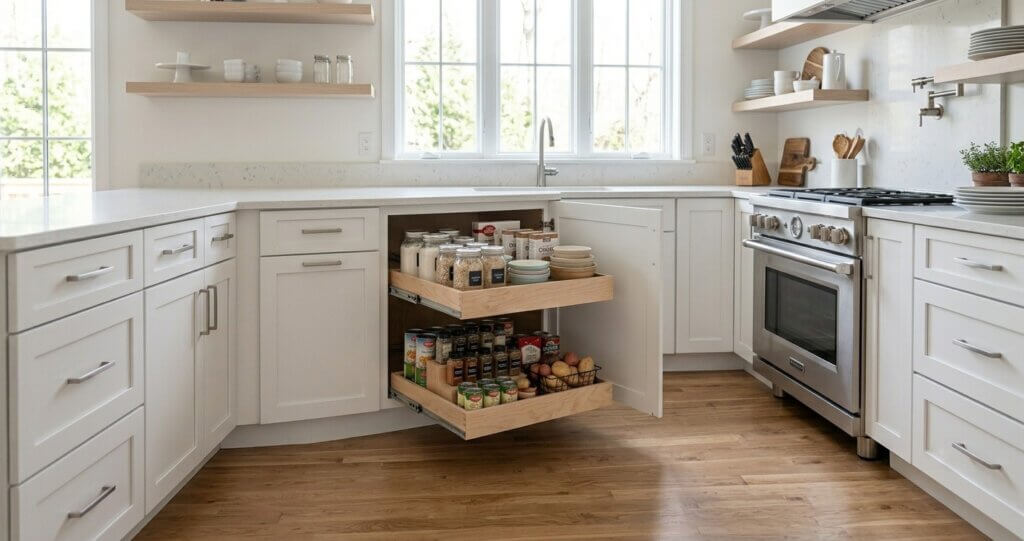
Upgrading your kitchen doesn’t require a total demolition. Whether you are retrofitting an older kitchen or learning how to build a cabinet with drawers from scratch, adding custom pull out cabinet shelves is the ultimate weekend project to maximize your storage space.
The ROI / Why Our Method Works
If you are constantly frustrated by crawling on your hands and knees to find a single pot buried in the back of a dark base cabinet, you have likely looked into upgrading your kitchen storage. However, retrofitting an existing kitchen with factory-built slide out shelves for cabinets through a professional contractor is notoriously expensive, often costing thousands of dollars for a standard kitchen.
Many homeowners attempt to save money by settling for cheap, pre-made wire baskets found at big-box hardware stores. While these lightweight racks install quickly, they are structurally flawed.
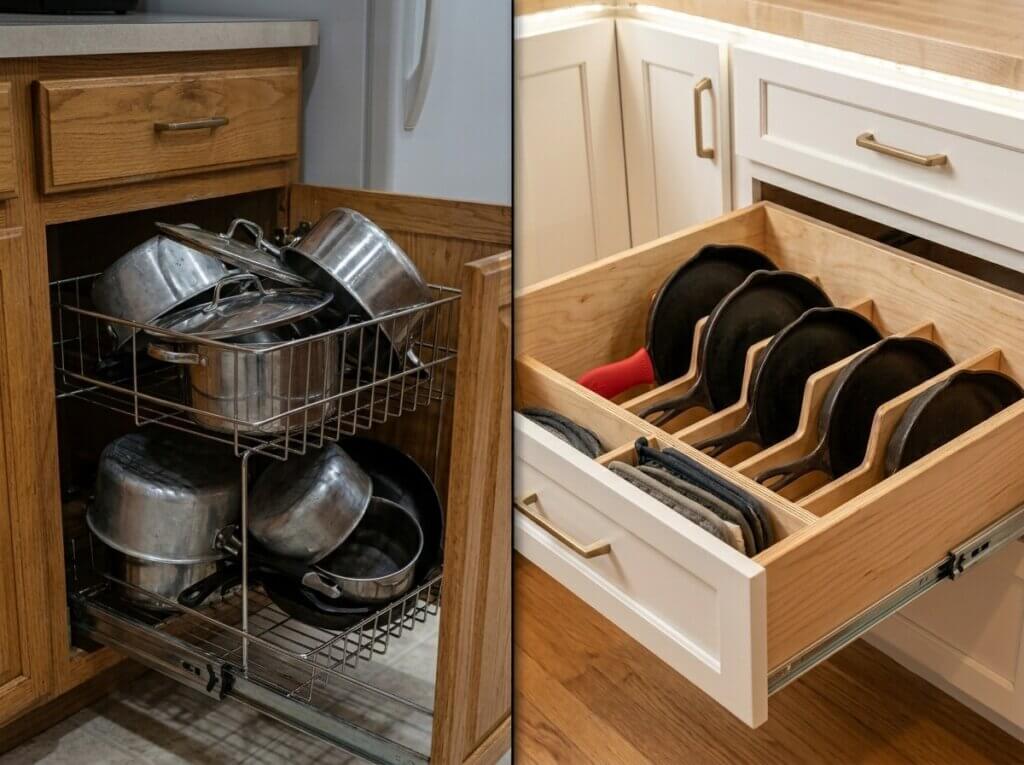
Wire racks instantly sag under the weight of heavy cast iron pans or canned pantry goods. Furthermore, their exposed side-mount roller wheels derail constantly, and the bulky metal frames waste valuable inches of lateral cabinet space.
By learning how to build drawers from scratch, you completely bypass the massive retail markup and the structural failures of wire racks. We focus entirely on building heavy-duty, custom plywood drawer boxes running on hidden, cold-rolled steel tracks. This specific woodworking method maximizes every square inch of your storage capacity and easily supports well over 100 pounds of weight per shelf.
| Upgrade Approach | Average Cost Per Shelf | Weight Capacity | Lifespan / Durability |
|---|---|---|---|
| Hiring a Custom Cabinet Contractor | $175 – $250 | 100+ lbs | Excellent (Decades) |
| Buying Retail Wire Pull-Out Racks | $70 – $120 | 30 – 50 lbs | Poor (Sags and derails) |
| Our DIY Plywood Drawer Method | $25 – $40 | 100+ lbs | Excellent (Decades) |
DIY Pull-Out Shelf Savings Calculator
Enter the number of pull-out shelves your kitchen needs below to see your exact estimated savings.
To see how this specific woodworking project fits into your overarching full room remodel, check out our master guide on high-ROI DIY interior upgrades and kitchen transformations.
The Materials & Science
When building cupboard pull out shelves, the structural integrity of your wood and the mechanics of your metal tracks dictate the entire success of the project.
You do not need expensive solid hardwood, but you absolutely cannot use standard construction pine or weak particle board for this upgrade. Sourcing the right 5/8-inch Baltic birch plywood and premium heavy duty pull out shelf hardware dictates the entire success of your build.
The Plywood “Gotcha” (Nominal vs. Actual Thickness)
Before you make your first cut, it is critical to understand that lumber yard measurements are not perfectly exact. Premium undermount drawer slides require very specific clearances to function correctly, meaning you cannot use standard 1/2-inch or 3/4-inch wood for the sides. You must use 5/8-inch material, but be aware that its actual, physical thickness is slightly smaller than the label claims.
| Plywood Label (Nominal) | True Thickness (Actual) | Metric Equivalent | Best Used For |
|---|---|---|---|
| 1/4-inch | 0.23″ | ~6mm | Drawer Bottoms (light duty) |
| 1/2-inch | 0.47″ | ~12mm | Drawer Bottoms (heavy duty) |
| 5/8-inch | 0.59″ | ~15mm | Drawer Box Sides (Required) |
| 3/4-inch | 0.70″ | ~18mm | Cabinet Carcass / Base |
1/2-Inch vs. 5/8-Inch Drawer Boxes
A massive roadblock for DIYers is deciding exactly what size plywood to purchase. For the sides, front, and back walls of your drawer box, 5/8-inch Baltic birch plywood is the undisputed industry standard for cabinet makers.
Why avoid 1/2-inch or 3/4-inch material?
- Standard 1/2-inch plywood is physically too thin to hold pocket hole screws securely; the metal screws frequently blow out the thin side walls under heavy tension.
- Conversely, 3/4-inch plywood is incredibly heavy, unnecessarily expensive, and eats up too much of your internal storage volume.
- 5/8-inch material provides the perfect structural balance of weight and strength. Furthermore, premium undermount drawer slides are engineered specifically with 5/8-inch plastic locking clips in mind.
When sourcing your wood, explicitly avoid standard big-box ACX pine plywood. Pine plywood is full of hidden internal voids and knots. If your screw hits an internal void during assembly, the joint will fail.
Baltic birch is manufactured with up to 13 uniform layers of solid hardwood veneer, giving it massive, uniform screw-holding power.
You can review the exact mechanical properties and grading systems of different plywood types through the APA – The Engineered Wood Association to understand exactly why birch dominates the cabinet-making industry.
The Slide Mechanics
For the mechanical glides, we strongly recommend skipping outdated, noisy side-mount epoxy tracks and investing strictly in undermount drawer slides (specifically Blum drawer slides or high-quality equivalents).
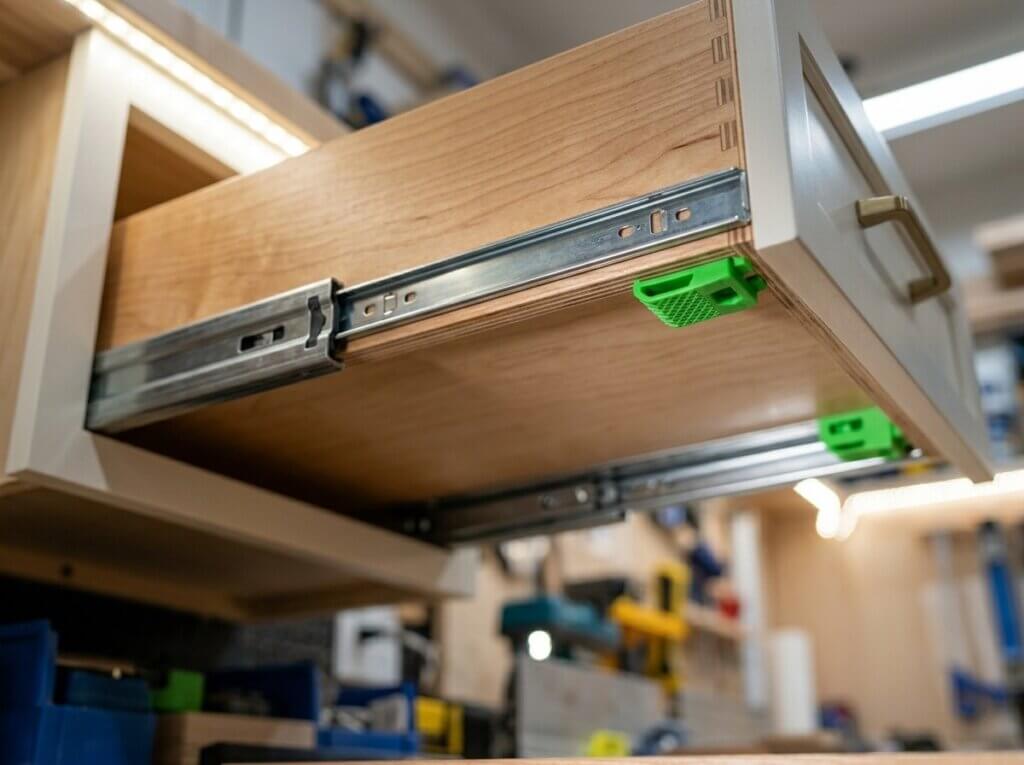
Undermount slides sit completely hidden beneath the plywood drawer box. This keeps the greased steel track protected from falling pantry dust and allows the wooden drawer to be built significantly wider, capturing every possible inch of horizontal cabinet space.
Note: Premium undermount slides are sometimes referred to as bottom mount drawer slides by retailers, so be sure to check the exact packaging terminology if you are buying your hardware in-store!
Drawer Box Size & Clearances (The Measurement Engine)
The single most critical phase of installing drawer slides is the mathematics. Fluffy DIY blogs often skip over material tolerances, but if your plywood drawer is cut even 1/16th of an inch too wide, the precision steel tracks will bind, grind, and physically refuse to close.
When people ask, “what size drawer slides do I need?”, the answer depends entirely on the internal depth of your cabinet box and whether you have a traditional face-frame or a modern frameless cabinet.
How to Calculate Drawer Size for Undermount Slides
- Calculating Slide Length: Measure the inside depth of your cabinet (measuring from the back interior wall straight to the inside edge of the front face frame). Your drawer slides sizes must be at least 1 inch shorter than this internal depth. For example, if your cabinet is 23 inches deep, you will purchase 21-inch heavy-duty undermount hardware.
- Calculating Drawer Box Depth: For undermount slides, the exterior depth of your wooden drawer box must match the slide length exactly. If you buy 21-inch slides, your drawer box must be built exactly 21 inches deepfrom the outside front wall to the outside back wall.
- Calculating Drawer Box Width: This requires absolute precision. Measure the exact width of your cabinet opening (the physical space the drawer must pass through). For standard 5/8-inch thick drawer boxes running on premium undermount drawer slides, you must subtract exactly 5/8 of an inch (0.625″) from your cabinet opening width. This final number gives you the exact exterior width of your wooden drawer box.
Drawer Dimensions Calculator
Enter your exact cabinet measurements below to generate your custom cut list.
Quick-Reference Drawer Slide Sizing Chart
If you are standing in the hardware store and just need a quick cheat sheet for standard cabinet depths, we have you covered. Remember, your heavy-duty undermount slides must be at least 1 inch shorter than the internal depth of your cabinet, and your wooden drawer box depth will match the slide length exactly.
| Minimum Internal Cabinet Depth | Undermount Slide Size to Buy | Exact Drawer Box Depth |
|---|---|---|
| 13 inches | 12-inch slides | 12 inches |
| 16 inches | 15-inch slides | 15 inches |
| 19 inches | 18-inch slides | 18 inches |
| 22 inches | 21-inch slides | 21 inches |
| 25 inches | 24-inch slides | 24 inches |
Drawer Slide Sizing Calculator
Enter your internal cabinet depth below to find the exact undermount slide size and drawer depth you need.
Measure from the back interior wall straight to the inside edge of the front face frame.
Essential Woodworking Tools for Drawer Building
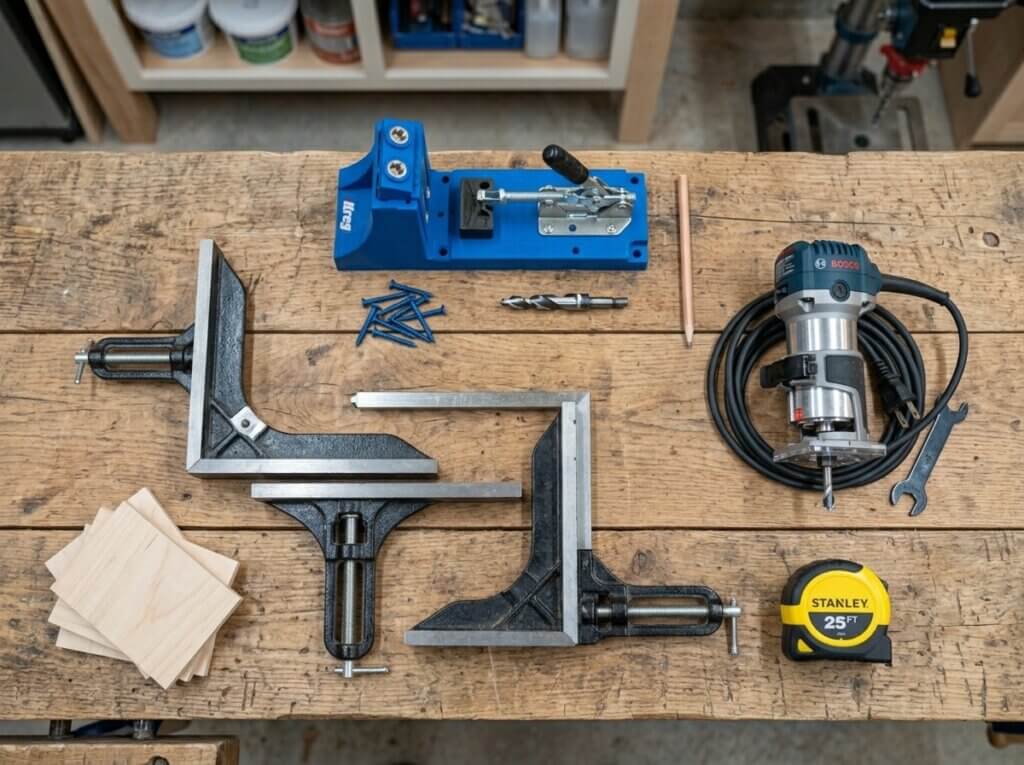
To build custom diy drawers that rival the quality of professional custom woodworking shops, you need tools that guarantee perfectly square cuts and perfectly flush internal joints.
| Tool Required | Primary Function | Best Practice |
|---|---|---|
| Table Saw or Track Saw | Ripping large plywood sheets into perfectly straight, uniform strips. | Ensure your blade is a high-tooth-count (60T+) fine-finishing blade to completely prevent tear-out on the delicate birch veneer. |
| Kreg Cabinet Jig | Drilling precision-angled pilot holes for high-strength, hidden joint assembly. | Set the drill collar and the jig base exactly to the 5/8-inch material thickness setting before drilling. |
| Compact Router & Straight Bit | Cutting a precisely measured 1/4-inch deep groove (dado) to house the drawer bottom panel securely. | Use a dedicated plywood undersized router bit (since retail 1/4" plywood is actually 7/32" thick) for a snug, rattle-free fit. |
| Right Angle Corner Clamps | Holding the drawer box corners perfectly at 90 degrees while you drive the assembly screws. | Absolutely essential for squaring a drawer box perfectly before the wood glue has a chance to dry. |
| Self-Centering Drill Bit (Vix Bit) | Drilling perfectly centered pilot holes for the metal slide track mounting screws. | Prevents the screw thread from wandering, which inevitably causes the metal track to sit crooked inside the cabinet. |
Step-by-Step Execution: How to Build a Drawer Box
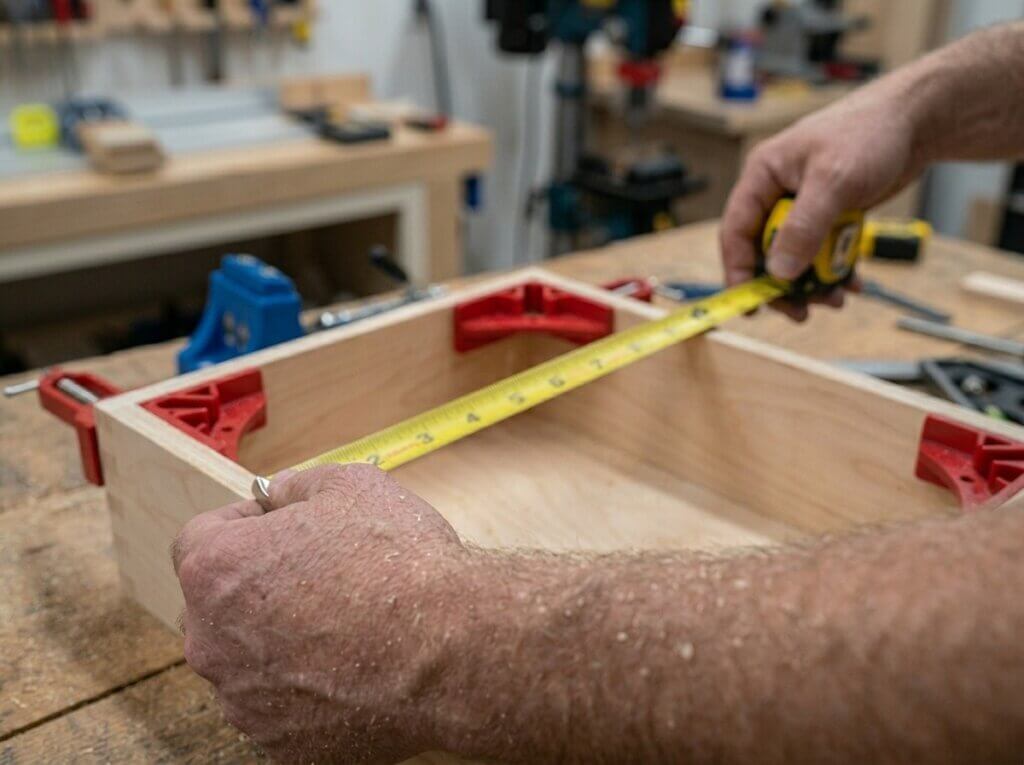
This is the exact, data-backed sequence to build your pull out pantry shelves or standard base cabinet roll-outs without errors.
1. Cut the Plywood Parts: Using your table saw or track saw, rip your 5/8-inch Baltic birch into long strips. For a standard pull out cabinet shelf, a side-wall height of 3 to 4 inches is ideal. Cut your two side pieces to match the exact length of your metal slide (e.g., 21 inches). Cut your front and back pieces to match your calculated width, but subtract an additional 1.25 inches to account for the physical thickness of the two 5/8-inch side walls that will overlap them.
Plywood Cut List & Yield Calculator
Enter your custom drawer dimensions to calculate exactly how much plywood you need to buy for your project.
2. Route the Bottom Groove: Your 1/4-inch plywood bottom panel must be fully captured inside the solid walls of the box. Set your compact router to cut a groove exactly 1/4-inch wide and 1/4-inch deep. Run this groove along the inside bottom edge of all four pieces. Crucial Placement: Position this groove exactly 1/2-inch up from the bottom edge of the wood so the steel undermount mechanisms can sit completely hidden underneath the drawer.
3. Drill the Pocket Holes: Grab your Kreg pocket hole jig. On the outside-facing faces of your front and back wooden pieces, drill two pocket holes on the far left edge and two on the far right edge. Drill these angled holes above the routed groove so your metal screws do not accidentally pierce the empty bottom panel channel.
4. Assemble and Glue the Box: Apply a high-quality PVA wood glue (like Titebond II or III) to the exposed end grain of the front and back pieces. Connect one side piece flush to the front piece and lock the corner firmly into a right angle clamp. Drive 1-inch coarse-thread pocket hole screws into the pre-drilled holes. Slide your 1/4-inch plywood bottom panel smoothly into the routed grooves, attach the back piece, and finally secure the second side piece.
5. Perform the Mandatory Squaring Check: Before the wood glue begins to tack, take a precision tape measure and measure the wooden box diagonally from corner to corner (top-left to bottom-right, then top-right to bottom-left). These two numbers must be exactly identical. If one measurement is even 1/16th of an inch larger, the box is out of square. Gently push the longer corners inward until the diagonal measurements match perfectly, then leave the box to dry.
6. Notch the Back of the Drawer: Because blum undermount drawer slides run directly underneath the wooden box, the steel tracks must pass through the back wall. Use a jigsaw to cut a notch into the bottom-left and bottom-right corners of the back plywood piece. The notch must be exactly 1-3/8 inches wide and 1/2-inch tall. Directly above this notch, drill a 6mm hole into the back wall where the metal anchor pin of your slide will stab into the wood.
If you have ever wondered how to build drawers perfectly square, the secret is entirely in the prep work.
How to Install Drawer Slides
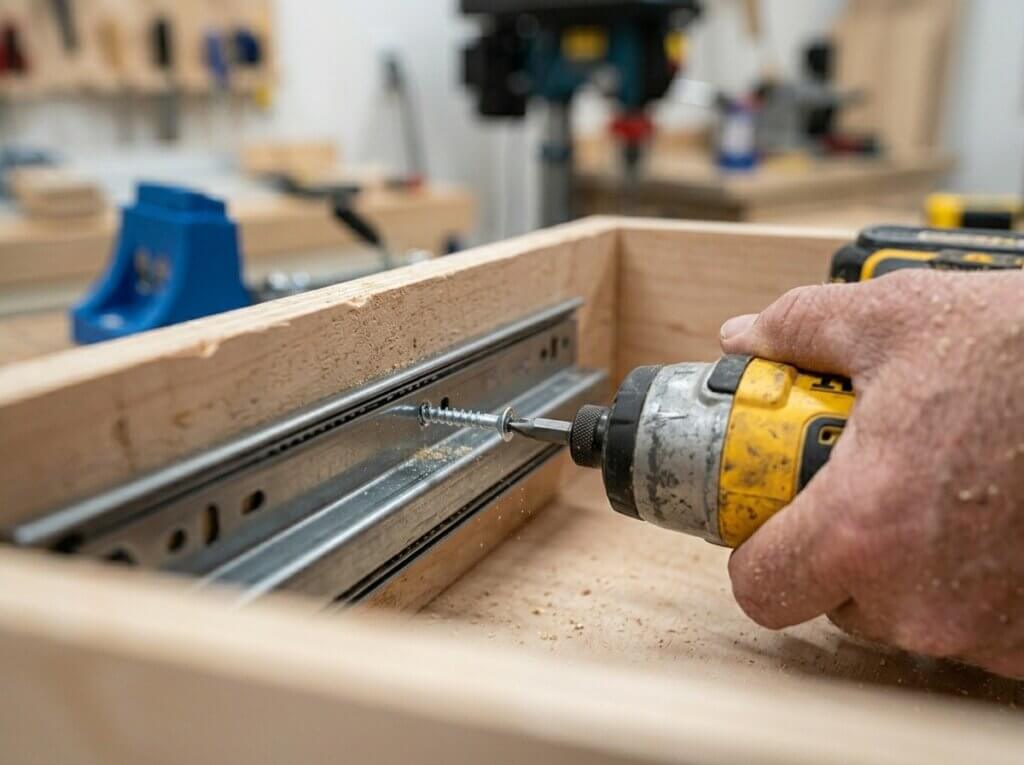
With the custom wooden box successfully built and fully cured, you must master the mechanics of how to install drawer slides directly to the cabinet frame.
1. Mount the Tracks to the Cabinet Box: If you have modern frameless cabinets, screw the metal slides directly to the flat inside side walls of the cabinet box. For traditional American face-frame cabinets, cut scrap strips of plywood and screw them directly to the inside walls of your cabinet until they build out the wall to sit perfectly flush with the inner edge of the face frame. Screw the slides directly into this solid wood blocking for a maximum-strength, zero-flex hold. Always refer to your specific manufacturer's technical PDF for exact screw setback measurements.
2. Attach the Locking Clips: Flip your newly built plywood drawer box completely upside down. Take the left and right plastic undermount locking clips and place them tightly in the front corners, ensuring they sit completely flush against both the front and side walls. Pre-drill shallow pilot holes using your self-centering Vix bit, and secure the plastic clips firmly with the provided screws.
3. Engage the Mechanics: Place the finished drawer box directly onto the fully extended metal tracks. Push the drawer box straight back into the cabinet until you hear a loud, satisfying click. This indicates the steel pins on the back of the track have stabbed safely into your pre-drilled rear holes, and the front plastic clips have securely locked onto the steel track hooks.
Test the mechanical glide. A perfectly square box paired with high-quality soft-close undermount slides will require almost zero physical force to open, and will slowly pull itself shut completely flush using a built-in hydraulic dampener.
This upgrade instantly transforms your basic, frustrating cabinet into a high-end, custom pull-out pantry.
Undermount Slide Troubleshooting Matrix
No DIY project goes perfectly on the first try. Placing a troubleshooting matrix at the bottom of your article keeps frustrated readers on your page instead of bouncing back to Google for a solution.
| The Problem | The Likely Culprit | The Fix |
|---|---|---|
| Drawer won't close all the way | The back notch is too shallow. | Remove the drawer and cut the rear notches slightly higher/wider. |
| Drawer feels stiff or binds | The box is not perfectly square. | Measure diagonals; you may need to shim the track or rebuild the box. |
| Slides won't lock into the clips | Drawer box is too wide/narrow. | Ensure the box width is exactly 5/8" smaller than the cabinet opening. |
| Drawer face hits the cabinet frame | Slides mounted too far forward. | Remount the steel tracks exactly 1/8" back from the front edge. |
Enjoy Your Upgraded Kitchen
Building your own custom pull-out shelves is one of the most rewarding DIY projects you can tackle. Not only does it instantly add high-end, functional storage to your home, but by building it yourself, you avoid the massive markup of custom cabinetry shops and the frustrating limitations of flimsy retail wire racks.
Take your time with the measurements, trust your pocket hole joinery, and rely on your spacer blocks to keep everything perfectly level. Once you hear those undermount slides click into place and feel that smooth, soft-close action for the first time, you will want to upgrade every single cabinet in your house!
Pro Tip for Spices: You can use these exact same measurement mechanics to build a narrow pull out spice rack right next to your stove. Simply adjust the width of your plywood cut list to fit a narrow 6-inch or 9-inch cabinet opening, while keeping all slide clearances, groove depths, and the 5/8-inch plywood thickness identical.
FAQ
Q. What size drawer slides do I need for a 24-inch cabinet?
A. For a standard 24-inch deep base cabinet, you should purchase 21-inch heavy-duty undermount drawer slides. The rule of thumb is that your drawer slide length must be at least one full inch shorter than the internal physical depth of your cabinet.
Q. What is the best wood to use for DIY cabinet drawers?
A. Baltic birch plywood is the absolute best wood for building DIY cabinet drawers. It is structurally superior to standard construction plywood, holds screws incredibly tightly, and features a void-free core that provides a beautiful, smooth finish for the drawer box.
Q. Do I really have to use 5/8-inch plywood for undermount drawer slides?
A. Yes, you must use 5/8-inch thick plywood for the side walls of your drawer box when using premium undermount slides. The metal tracks and the plastic locking mechanisms are specifically engineered by the manufacturers to wrap around the exact thickness of 5/8-inch material.
Q. How much weight can custom plywood pull-out shelves hold?
A. Custom 5/8-inch plywood pull-out shelves installed on heavy-duty undermount slides can safely hold between 75 and 100 pounds. This makes them perfectly suited for organizing heavy kitchen items like cast iron skillets, Dutch ovens, glass jars, and canned pantry goods.
Q. Can I install undermount drawer slides without using a spacer block?
A. While you can install them by manually measuring and drawing level lines, using a scrap wood spacer block is highly recommended. Resting the metal tracks on a spacer block guarantees that both sides are installed perfectly parallel and at the exact same height.
Q. Why won't my wooden drawer close all the way on undermount slides?
A. If your drawer box will not close completely flush, the rear clearance notches cut into the back wall of the wood are likely too shallow. Remove the drawer box from the tracks and cut the notches slightly higher and wider to allow the slides to seat properly.
Your cabinets now function like a dream on the inside, but what about the outside? Don't rip out those dated cabinets! You can completely modernize your space for a fraction of the cost. Check out our guide on [How to Update DIY Kitchen Cabinets (Without Replacing Them)] to learn the exact painting and hardware secrets that will save you thousands.
Safety Disclaimer: DIY projects involve the use of chemicals, power tools, and materials that can cause injury. Always wear proper PPE (Personal Protective Equipment), read manufacturer safety manuals, and ensure proper ventilation.

The Harvest Home Life Team is a collective of hands-on researchers and material evaluators dedicated to data-driven home improvement. Operating out of our active testing workshop, we deliver field-tested blueprints, rigorous tool diagnostics, and precise cut-lists. From calculating shear strength for load-bearing mounts to diagnosing structural deficiencies, we provide the objective data required to execute professional-grade DIY projects safely and effectively.